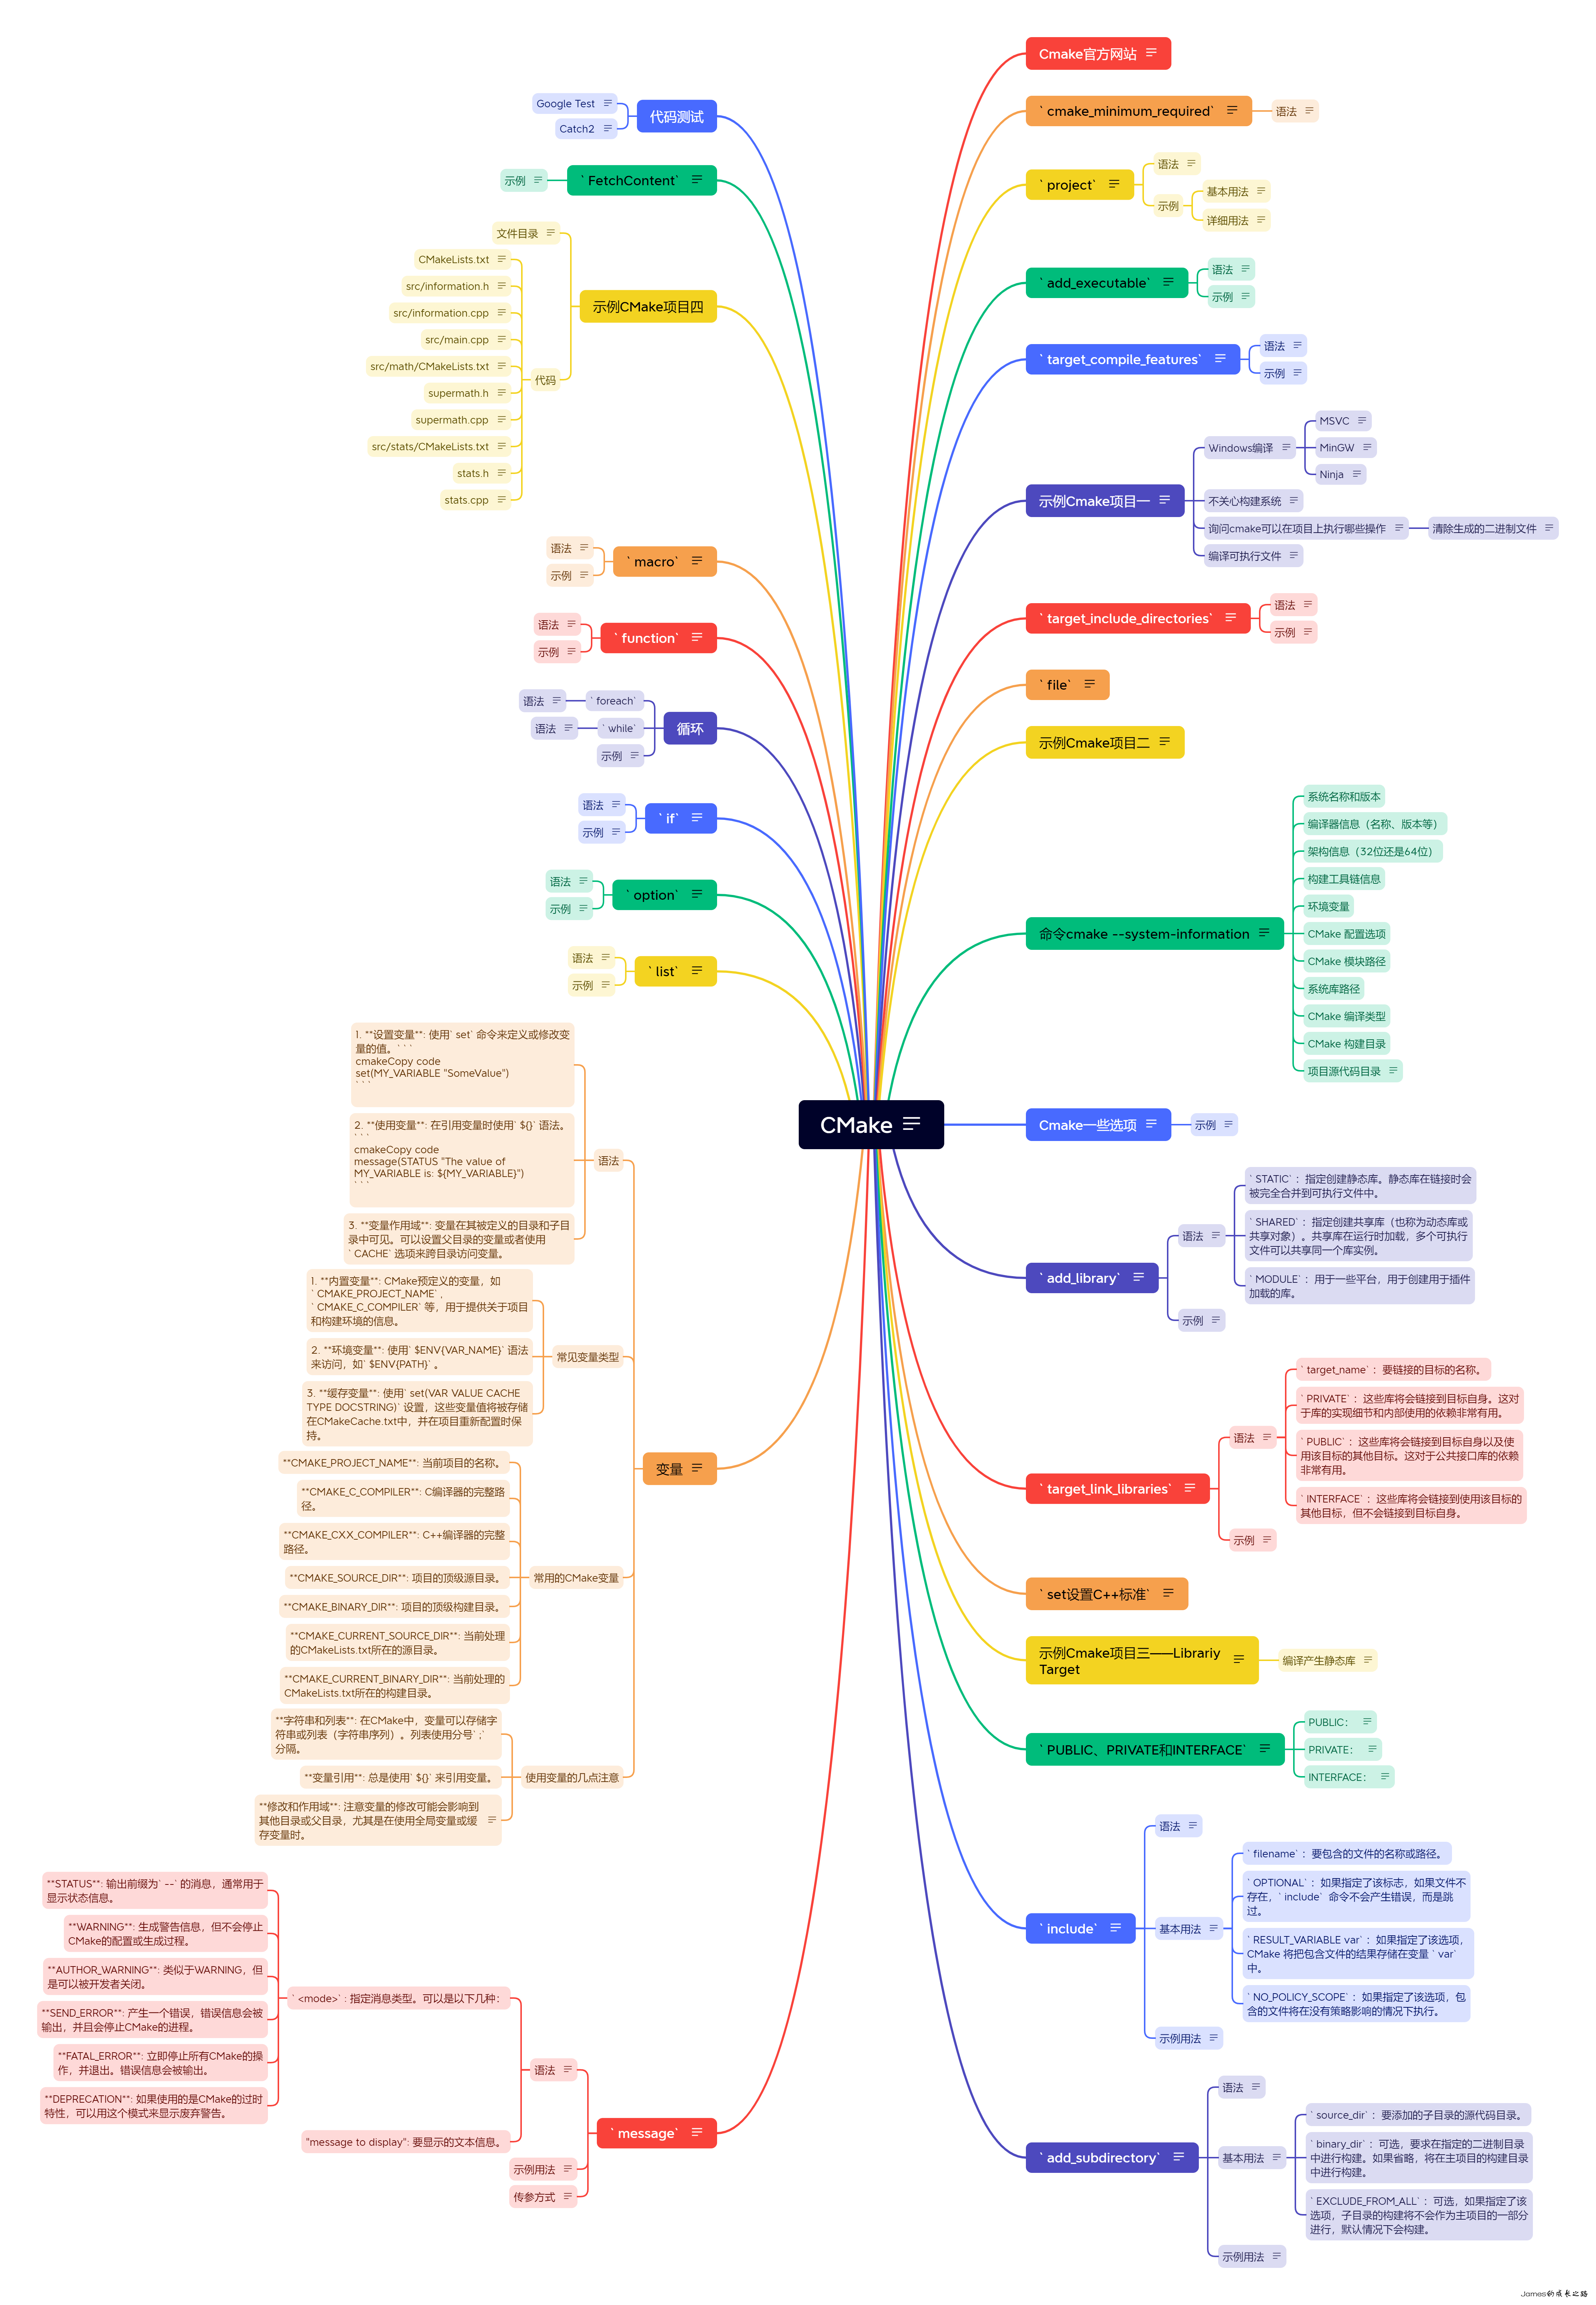
CMake

本笔记参照于Youtube博主LearnQtGuide的教程CMake-Episode源码

Cmake官方网站

文档

cmake_minimum_required

设置项目最低cmake版本,必须有,官方文档

语法

1
cmake_minimum_required(VERSION <min>[...<policy_max>] [FATAL_ERROR])

project

用于定义项目的基本信息和属性。官方文档

语法

1
2
3
4
5
6
project(<PROJECT-NAME> [<language-name>...])
project(<PROJECT-NAME>
[VERSION <major>[.<minor>[.<patch>[.<tweak>]]]]
[DESCRIPTION <project-description-string>]
[HOMEPAGE_URL <url-string>]
[LANGUAGES <language-name>...])

示例

基本用法

1
project(MyProject C CXX)

这表示你的项目名称是"MyProject",并且将使用C和C++作为编程语言。

详细用法

1
2
3
4
project(HelloApp
VERSION 0.0.1
DESRIPTION "The leading Hello World APP"
LANGUAGES CXX)

项目名称是"HelloApp",版本号是0.0.1,项目描述是"The leading Hello World APP",并且项目将使用C++作为编程语言。

add_executable

告诉 CMake 如何将一组源代码文件编译成一个可执行文件。官方文档

语法

1
2
3
add_executable(<name> [WIN32] [MACOSX_BUNDLE]
[EXCLUDE_FROM_ALL]
[source1] [source2 ...])

示例

1
add_executable(HelloAppBinary main.cpp)

"MyProgram" 是你想要生成的可执行文件的名称,而 main.cpp是源代码文件的列表。

target_compile_features

用于指定目标(可执行文件、库等)所需编译特性(C++标准、语言特性等)。官方文档

语法

1
target_compile_features(<target> <PRIVATE|PUBLIC|INTERFACE> <feature> [...])

示例

1
target_compile_features(HelloAppBinary PRIVATE cxx_std_20)

"HelloAppBinary" 是你的库的名称,PRIVATE 表示这些编译特性仅在当前目标中可用,而 `cxx_std_20 表示使用 C++20 标准的特性。

示例Cmake项目一

main.cpp

1
2
3
4
5
6
7
8
9
10
11
12
13
14
#include <iostream>
#include <concepts>

template <typename T>
requires std::integral<T>
T add(T a, T b){
return a + b;
}

int main(){
std::cout << "Hello from C++ 20 with CMake on Linux/Windows" << std::endl;
std::cout << "The sum is : " << add(7,5) << std::endl;
return 0;
}

CMakeLists.txt

1
2
3
4
5
6
7
cmake_minimum_required(VERSION 3.5)
project(HelloApp
VERSION 0.0.1
DESCRIPTION "The leading Hello World APP"
LANGUAGES CXX)
add_executable(HelloAppBinary main.cpp)
target_compile_features(HelloAppBinary PRIVATE cxx_std_20)

Windows编译

cmake --help可以看到命令使用文档,在Windows下默认使用VS平台构建项目,Linux默认使用Unix Makefiles。可以通过选项-G指定平台。

MSVC

1
cmake .

这将默认生成MSVC构建系统文件(如Makefile、Visual Studio项目等)。

下面的命令应该使用VS Developer Powershell运行:

1
msbuild .\HelloApp.sln

这将编译成可执行文件。

MinGW

1
cmake -G "MINGW Makefiles" ..\source\

这将构建MinGW项目。

1
mingw-32make

编译成可执行文件。

Ninja

Ninja 是一个高速且轻量级的构建系统,旨在提供更快的构建速度和更低的内存占用。

1
cmake -G "Ninja" ..\source\

这将构建Ninja项目。

1
ninja 

编译成可执行文件。

不关心构建系统

cmake生成项目之后直接执行以下命令进行编译。

1
cmake --bulid .

编译成可执行文件。

询问cmake可以在项目上执行哪些操作

1
cmake --build . --target help

清除生成的二进制文件

1
cmake --build . --target clean

这将只保留项目文件。

编译可执行文件

1
cmake --build . --target HelloAppBinary

编译成可执行文件。

target_include_directories

指定目标的头文件搜索路径,通常用于为特定的目标(比如可执行文件、静态库、共享库等)设置编译时的头文件搜索路径。官方文档

语法

1
2
3
target_include_directories(<target> [SYSTEM] [AFTER|BEFORE]
<INTERFACE|PUBLIC|PRIVATE> [items1...]
[<INTERFACE|PUBLIC|PRIVATE> [items2...] ...])

示例

1
target_include_directories(HelloBinary PRIVATE ${CMAKE_CURRENT_SOURCE_DIR}/include)

file

file 命令是 CMake 中用于操作文件和目录的命令之一。它允许你执行各种文件和目录操作,如拷贝、移动、创建目录、查找文件等。官方文档

以下是一些常见的 file 命令的用法:

拷贝文件:

1
file(COPY source_file DESTINATION destination_directory)

这个命令可以用来将源文件拷贝到目标目录。

移动文件:

1
file(RENAME old_name new_name)

这个命令可以用来将文件从一个名称重命名为另一个名称。

创建目录:

1
file(MAKE_DIRECTORY directory_name)

这个命令可以用来在指定的路径下创建一个新的目录。

删除文件或目录:

1
2
file(REMOVE [file1 ...])
file(REMOVE_RECURSE directory)

这些命令可以用来删除指定的文件或目录。

查找文件:

1
file(GLOB variable [LIST_DIRECTORIES true/false] [globbing expressions])

这个命令可以用来查找满足指定模式的文件,并将结果存储在变量中。你可以使用通配符或正则表达式来指定匹配的模式。

检查是否为目录:

1
file(IS_DIRECTORY directory_name)

这个命令可以用来检查指定的路径是否为一个目录。

获取文件的大小:

1
file(SIZE filename variable)

这个命令可以用来获取指定文件的大小,并将结果存储在变量中。

但是不建议使用file搜寻所有文件放到global变量中,一些读物

示例Cmake项目二

include目录:dog.h operations.h

dog.h

1
2
3
4
5
6
7
8
9
10
11
12
13
14
15
16
17
18
19
20
21
22
23
24
25
26
27
28
29
#ifndef DOG_H
#define DOG_H
#include <string>
#include <iostream>
class Dog
{
public:
explicit Dog(std::string name_param);
Dog() = default;
~Dog();

std::string get_name() const{
return dog_name;
}

void set_dog_name(const std::string & name){
dog_name = name;
}

void print_info(){
std::cout << "Dog [ name : " << dog_name << " ]" << std::endl;
}

private:
std::string dog_name {"Puffy"};

};

#endif // DOG_H

operations.h

1
2
3
4
5
6
#ifndef OPERATIONS_H
#define OPERATIONS_H

double add(double a, double b);

#endif // OPERATIONS_H

src目录:dog.cpp operations.cpp

dog.cpp

1
2
3
4
5
6
7
8
9
10
11
#include "dog.h"
#include <iostream>

Dog::Dog(std::string name_param) : dog_name(name_param){
std::cout << "Constructor for dog " << dog_name << " called" << std::endl;
}

Dog::~Dog(){
std::cout << "Destructor for dog " << dog_name << " called" << std::endl;
}

operations.cpp

1
2
3
4
5
#include "operations.h"

double add(double a, double b){
return a + b;
}

main.cpp

1
2
3
4
5
6
7
8
9
10
11
#include <iostream>
#include "dog.h"
#include "operations.h"

int main(){

Dog dog1("Flitzy");
dog1.print_info();

return 0;
}

CMakeLists.txt

1
2
3
4
5
6
7
8
9
10
cmake_minimum_required(VERSION 3.5)
project(HelloApp
VERSION 0.0.1
DESCRIPTION "The leading Hello World APP"
LANGUAGES CXX)

#target
add_executable(HelloAppBinary main.cpp src/dog.cpp src/operations.cpp)
target_compile_features(HelloAppBinary PRIVATE cxx_std_20)
target_include_directories(HelloAppBinary PRIVATE ${CMAKE_CURRENT_SOURCE_DIR}/include)

命令cmake --system-information

--system-information 选项用于打印有关系统和构建环境的信息。当你在命令行中运行以下命令时,CMake 将显示与系统和构建环境相关的各种信息:

包括但不限于:

  • 系统名称和版本
  • 编译器信息(名称、版本等)
  • 架构信息(32位还是64位)
  • 构建工具链信息
  • 环境变量
  • CMake 配置选项
  • CMake 模块路径
  • 系统库路径
  • CMake 编译类型
  • CMake 构建目录
  • 项目源代码目录

但是这将打印到终端,很影响阅读,可以传递一个文件名写入到到文件中。

Cmake一些选项

-D 标志用于设置 CMake 变量的值。这可以通过命令行来覆盖在 CMakeLists.txt 文件中定义的默认值。通过 -D 标志,你可以在生成构建系统时直接指定变量的值,而无需手动编辑 CMakeLists.txt 文件。

-G(或 --generator)选项用于指定要使用的生成器,这是一个构建系统生成工具。生成器根据指定的构建配置生成适合特定平台或开发环境的构建文件,例如 Makefile、Visual Studio 项目文件、Ninja 构建文件等。

-T 这个选项,它用于指定工具集(Toolset)的名称。工具集是一组特定的编译器和工具链,可以在不同的构建环境中使用。

示例

1
cmake -G "Visual Studio 17 2022" -T "ClangCL" ../source
1
cmake -G "Ninja" -D CMAKE_CXX_COMPILER=cl ../source

add_library

用于定义和构建一个库(静态库或共享库)目标。库是一组编译后的对象文件的集合,它可以供其他目标(如可执行文件或其他库)链接使用。

语法

1
2
3
add_library(<name> [STATIC | SHARED | MODULE]
[EXCLUDE_FROM_ALL]
[<source>...])
  • STATIC:指定创建静态库。静态库在链接时会被完全合并到可执行文件中。
  • SHARED:指定创建共享库(也称为动态库或共享对象)。共享库在运行时加载,多个可执行文件可以共享同一个库实例。
  • MODULE:用于一些平台,用于创建用于插件加载的库。

示例

1
add_library(operations STATIC src/operations.cpp)

创建一个名为 operations的静态库,源文件为operations.cpp 。

1
add_library(logger STATIC logger/src/log.cpp)

创建一个名为 logger的静态库,源文件为log.cpp 。

用于指定目标与其他库之间的链接关系。它告诉 CMake 在链接可执行文件或库时需要使用哪些其他库。这通常用于链接目标与依赖的库,包括系统库和自定义库。

语法

1
2
3
4
5
target_link_libraries(target_name
PRIVATE lib1 lib2 ...
PUBLIC lib3 lib4 ...
INTERFACE lib5 lib6 ...
)
  • target_name:要链接的目标的名称。
  • PRIVATE:这些库将会链接到目标自身。这对于库的实现细节和内部使用的依赖非常有用。
  • PUBLIC:这些库将会链接到目标自身以及使用该目标的其他目标。这对于公共接口库的依赖非常有用。
  • INTERFACE:这些库将会链接到使用该目标的其他目标,但不会链接到目标自身。

示例

1
target_link_libraries(HelloAppBinary PUBLIC operations logger)

链接 HelloAppBinary可执行文件与 operations,logger静态库。

set设置C++标准

1
2
set(CXX_STANDARD_REQUIRED ON)
set(CMAKE_CXX_STANDARD 20) # 设置 C++ 标准为 C++20

示例Cmake项目三——Librariy Target

有关静态库和动态库

编译产生静态库

仍然使用项目二的代码基础上新增log文件来做演示。在项目根目录新增looger文件夹。其中新建include文件夹和src文件夹。

include文件夹放入log.h

1
2
3
4
5
6
7
8
9
10
11
12
#ifndef LOG_H
#define LOG_H

enum class LogType{
MESSAGE,
WARNING,
FATAL_ERROR
};;

void log_data(const char* message, LogType lt);

#endif // LOG_H

src文件夹放入log.cpp

1
2
3
4
5
6
7
8
9
10
11
12
13
14
15
16
17
18
19
20
21
22
#include "log.h"
#include <iostream>

void log_data(const char* message, LogType lt){
auto value = ((10 <=> 20) > 0);

switch (lt)
{
case LogType::MESSAGE:
std::cout << "Message : " << message << std::endl;
break;
case LogType::WARNING:
std::cout << "Warning : " << message << std::endl;
break;
case LogType::FATAL_ERROR:
std::cout << "Fatal Error : " << message << std::endl;
break;

default:
break;
}
}

CMakeLists.txt

1
2
3
4
5
6
7
8
9
10
11
12
13
14
15
16
17
18
19
20
21
22
23
24
25
26
cmake_minimum_required(VERSION 3.5)

#set(CXX_STANDARD_REQUIRED ON) #Make C++20 a hard requirement
#set(CMAKE_CXX_STANDARD 20) # Default C++ standard for targets

project(HelloApp
VERSION 1.0.0
DESCRIPTION
"The leading Hello World App"
LANGUAGES CXX)

add_library(operations STATIC src/operations.cpp)
target_include_directories(operations PUBLIC ${CMAKE_CURRENT_SOURCE_DIR}/include)
target_compile_features(operations PUBLIC cxx_std_20)


add_library(logger STATIC logger/src/log.cpp)
target_compile_features(logger PUBLIC cxx_std_20)
target_include_directories(logger PUBLIC ${CMAKE_CURRENT_SOURCE_DIR}/logger/include)

add_executable(HelloAppBinary main.cpp
src/dog.cpp)

target_include_directories(HelloAppBinary PUBLIC ${CMAKE_CURRENT_SOURCE_DIR}/include)
target_compile_features(HelloAppBinary PUBLIC cxx_std_20)
target_link_libraries(HelloAppBinary PUBLIC operations logger)

main.cpp

1
2
3
4
5
6
7
8
9
10
11
12
13
14
15
16
17
#include <iostream>
#include "operations.h"
#include "dog.h"
#include "log.h"

int main(){

double result = add(2,70);
std::cout << "result : " << result << std::endl;

Dog dog("Flitzy");
dog.print_info();

log_data("Hello there",LogType::FATAL_ERROR);

return 0;
}

PUBLIC、PRIVATE和INTERFACE

PUBLICPRIVATEINTERFACE 是用于指定目标(如库或可执行文件)属性的关键字。这些关键字用于定义目标与其链接的依赖库之间的可见性和传递性。

PUBLIC:

使用 PUBLIC 关键字时,目标的属性将同时应用于目标自身以及依赖于该目标的其他目标。换句话说,使用了该目标的其他目标也会继承这个属性。

例如,当你使用 target_link_libraries 命令指定链接库的时候:

1
target_link_libraries(MyApp PUBLIC MyLibrary)

这会将 MyLibrary 的链接属性添加到 MyApp 目标,并且任何依赖于 MyApp 的目标也会继承这个属性。

PRIVATE:

使用 PRIVATE 关键字时,目标的属性仅适用于目标自身。依赖于该目标的其他目标不会继承这个属性。

例如,当你使用 target_include_directories 命令指定头文件路径时:

1
target_include_directories(MyApp PRIVATE ${CMAKE_SOURCE_DIR}/include)

这会将头文件路径添加到 MyApp 目标,但是依赖于 MyApp 的其他目标不会继承这个头文件路径。

INTERFACE:

使用 INTERFACE 关键字时,目标的属性仅适用于依赖于该目标的其他目标。目标自身不会获得这个属性。

例如,当你使用 target_link_libraries 命令指定链接库时,同时使用 INTERFACE

1
target_link_libraries(MyApp INTERFACE MyInterfaceLibrary)

这会将链接属性添加到 MyApp 的依赖目标,但是 MyApp 本身不会链接到 MyInterfaceLibrary

使用这些关键字,你可以更精细地控制属性的传递和可见性,以确保你的构建正确地配置和链接依赖项。这在创建库的接口和实现细节时特别有用,因为它允许你在不同的情况下区分目标属性。

include

include 命令在 CMake 中用于包含其他 CMake 脚本文件,以便在当前脚本中使用其中定义的命令、变量和函数。这是一种组织 CMake 配置的常用方式,可以使配置更加模块化和可维护。

语法

1
2
include(<file|module> [OPTIONAL] [RESULT_VARIABLE <var>]
[NO_POLICY_SCOPE])

基本用法

1
include(filename [OPTIONAL] [RESULT_VARIABLE var] [NO_POLICY_SCOPE])
  • filename:要包含的文件的名称或路径。
  • OPTIONAL:如果指定了该标志,如果文件不存在,include 命令不会产生错误,而是跳过。
  • RESULT_VARIABLE var:如果指定了该选项,CMake 将把包含文件的结果存储在变量 var 中。
  • NO_POLICY_SCOPE:如果指定了该选项,包含的文件将在没有策略影响的情况下执行。

示例用法

1
2
3
4
5
# 包含另一个 CMake 脚本文件
include(AnotherCMakeScript.cmake)

# 包含一个不存在的文件(可选)
include(NonExistentFile.cmake OPTIONAL)

通常,include 命令用于将一组相关的 CMake 命令和配置放在一个单独的脚本文件中,然后在主要的 CMakeLists.txt 文件中使用 include 命令来导入这些配置。这有助于保持项目配置的结构和清晰度。

add_subdirectory

add_subdirectory 是 CMake 中的一个命令,用于向当前项目添加一个子目录。它允许你在主项目中包含其他的子项目,每个子项目都可以拥有自己的 CMakeLists.txt 文件和构建配置。

语法

1
add_subdirectory(source_dir [binary_dir] [EXCLUDE_FROM_ALL] [SYSTEM])

基本用法

1
add_subdirectory(source_dir [binary_dir] [EXCLUDE_FROM_ALL])
  • source_dir:要添加的子目录的源代码目录。
  • binary_dir:可选,要求在指定的二进制目录中进行构建。如果省略,将在主项目的构建目录中进行构建。
  • EXCLUDE_FROM_ALL:可选,如果指定了该选项,子目录的构建将不会作为主项目的一部分进行,默认情况下会构建。

示例用法

假设你的项目结构如下:

1
2
3
4
5
6
7
8
9
luaCopy codeMyProject/
|-- CMakeLists.txt
|-- src/
| |-- main.cpp
| |-- ...
|-- subproject/
| |-- CMakeLists.txt
| |-- submain.cpp
| |-- ...

MyProject/CMakeLists.txt 中,你可以使用 add_subdirectory 命令来添加 subproject 子目录:

1
add_subdirectory(subproject)

subproject/CMakeLists.txt 中,你可以定义子项目的构建规则和配置。

通过使用 add_subdirectory,你可以将项目拆分为更小的模块,每个模块都有自己的构建和配置。这种方法有助于提高项目的可维护性和清晰度,同时允许在不同的子项目中定义不同的构建和设置。

message

message命令用于在执行CMake配置过程中输出信息。它通常用于调试、显示变量的值、显示错误或状态消息等。

语法

1
2
3
4
5
6
7
8
General messages
message([<mode>] "message text" ...)

Reporting checks
message(<checkState> "message text" ...)

Configure Log
message(CONFIGURE_LOG <text>...)
  • <mode>: 指定消息类型。可以是以下几种:
    • STATUS: 输出前缀为--的消息,通常用于显示状态信息。
    • WARNING: 生成警告信息,但不会停止CMake的配置或生成过程。
    • AUTHOR_WARNING: 类似于WARNING,但是可以被开发者关闭。
    • SEND_ERROR: 产生一个错误,错误信息会被输出,并且会停止CMake的进程。
    • FATAL_ERROR: 立即停止所有CMake的操作,并退出。错误信息会被输出。
    • DEPRECATION: 如果使用的是CMake的过时特性,可以用这个模式来显示废弃警告。
  • "message to display": 要显示的文本信息。

示例用法

1
2
3
4
5
6
7
8
9
10
11
12
13
14
15
# 基本状态消息
message(STATUS "Configuring Project")

# 显示变量的值
set(VAR_NAME "Hello World")
message(STATUS "The value of VAR_NAME is: ${VAR_NAME}")

# 警告消息
message(WARNING "This is a warning message")

# 发送错误消息,将会停止CMake的配置或生成过程
message(SEND_ERROR "Error encountered!")

# 致命错误,将立即终止CMake进程
message(FATAL_ERROR "Fatal error occurred")

传参方式

1
2
3
4
5
6
7
8
9
10
11
12
13
14
15
16
17
18
19
20
21
22
23
24
25
26
27
28
29
30
31
32
33
34
35
36
37
38
39
40
# Scripts can be run with the command below: 
# cmake -P <script_name>.cmake

# The message command. How it's generally used
# message("The sky is blue")

#[=[
The message command. How it's generally used
message("The sky is blue")
#]=]

#[====[
The message command. How it's generally used
message("The sky is blue")
#]====]

#1.Bracket arguments. Can be used to print multiple lines
# message([=[The
# sky
# is blue
# ]=])


#------------------------------------------------------------------------

#2.Quoted arguments and escapce sequences
# #Escaping characters
# message("The sky is blue: \" \n my friend")
# #Multiple lines in quoted arguments. New to me
# message("With great power...
# comes great responsibility")
# #Variable evaluation
# message("The cmake version is ${CMAKE_VERSION}")


#------------------------------------------------------------------------
# #3.Unquoted arguments. spaces and semicolons act as separatoers
message(The\ sky\ is\ blue) # One argument, the spaces are escaped
message(Two arguments) # Two arguments: the space acts as a separator
message(The;sky;is;blue) # Four arguments: The ; acts as a separator

变量

在CMake中,变量是用来存储信息,如路径、配置选项或是决定构建过程中行为的参数。以下是CMake中关于变量的一些基本概念和常用变量类型:

语法

  1. 设置变量: 使用set命令来定义或修改变量的值。

    1
    2
    cmakeCopy code
    set(MY_VARIABLE "SomeValue")
  2. 使用变量: 在引用变量时使用${}语法。

    1
    2
    cmakeCopy code
    message(STATUS "The value of MY_VARIABLE is: ${MY_VARIABLE}")
  3. 变量作用域: 变量在其被定义的目录和子目录中可见。可以设置父目录的变量或者使用CACHE选项来跨目录访问变量。

常见变量类型

  1. 内置变量: CMake预定义的变量,如CMAKE_PROJECT_NAME, CMAKE_C_COMPILER等,用于提供关于项目和构建环境的信息。
  2. 环境变量: 使用$ENV{VAR_NAME}语法来访问,如$ENV{PATH}
  3. 缓存变量: 使用set(VAR VALUE CACHE TYPE DOCSTRING)设置,这些变量值将被存储在CMakeCache.txt中,并在项目重新配置时保持。

常用的CMake变量

  • CMAKE_PROJECT_NAME: 当前项目的名称。
  • CMAKE_C_COMPILER: C编译器的完整路径。
  • CMAKE_CXX_COMPILER: C++编译器的完整路径。
  • CMAKE_SOURCE_DIR: 项目的顶级源目录。
  • CMAKE_BINARY_DIR: 项目的顶级构建目录。
  • CMAKE_CURRENT_SOURCE_DIR: 当前处理的CMakeLists.txt所在的源目录。
  • CMAKE_CURRENT_BINARY_DIR: 当前处理的CMakeLists.txt所在的构建目录。

使用变量的几点注意

  • 字符串和列表: 在CMake中,变量可以存储字符串或列表(字符串序列)。列表使用分号;分隔。
  • 变量引用: 总是使用${}来引用变量。
  • 修改和作用域: 注意变量的修改可能会影响到其他目录或父目录,尤其是在使用全局变量或缓存变量时。
1
2
3
4
5
6
7
8
9
10
11
12
13
14
15
16
17
18
19
20
21
22
23
24
25
26
27
28
29
30
31
32
33
34
35
36
37
38
39
40
41
42
43
44
45
46
47
48
49
50
51
52
53
54
55
56
57
58
59
#Variables may only contain alphanumeric characters and underscores: https://cmake.org/cmake/help/book/mastering-cmake/chapter/Writing%20CMakeLists%20Files.html#variables

# set(var_1 "Text1")
# set([[var2]] "Text2")
# set("var3" "Text3")

# message(${var_1})
# message(${var2})
# message(${var3})

#The bracket and quoted syntax allows spaces within variable names, but it's a bad practice and I won't explore that further.

#-------------------------------------------------------
#Variable references
# set(one abc) #abc
# set(two ${one}de) #abcde
# set(three ${two} fg) #abcde;fg
# set(four thre) #thre
# set(five ${${four}e}) #abcde;fg

# message(${one})
# message(${two})
# message(${three})
# message(${four})
# message(${five})


#-------------------------------------------------------
#environment variables

#Your own environment variables will affect the running cmake instance.
# They won't affect the system
# set(ENV{MY_PATH} "C:/Program Files/parent/child/bin")
# message($ENV{MY_PATH})

# #You can also read enviroment variables from the system
# message($ENV{TMP})
# message($ENV{ZES_ENABLE_SYSMAN})


#-------------------------------------------------------
#Cache variables
# set(cache_var "The value" CACHE STRING "This is a cache variable")
# message(${cache_var})


#-------------------------------------------------------
#CMake defined variables
#https://cmake.org/cmake/help/latest/manual/cmake-variables.7.html
#Keep in mind that some variables don't work on scripts. They are project oriented and work when you set up a project with a proper CMakeLists.txt file.

# #Print the cmake version
message(${CMAKE_VERSION})
#Print the location of the cmake executable
message(${CMAKE_COMMAND})
#Print the location of the current list file
message(${CMAKE_CURRENT_LIST_FILE})

list

在CMake中,list命令用于操作列表,其中列表是由分号分隔的字符串。列表在CMake中非常普遍,用于处理路径集合、源文件、定义标志等。list命令提供了一组功能来操作这些列表,包括添加元素、删除元素、查询列表信息等。

语法

1
2
3
list(LENGTH <list> <out-var>)
list(GET <list> <element index> [<index> ...] <out-var>)
list(JOIN <list> <glue> <out-var>)

示例

1
2
3
4
5
6
7
8
9
10
11
12
13
14
15
16
# 定义一个列表变量
set(SOURCES main.cpp helper.cpp utils.cpp)

# 向列表中添加元素
list(APPEND SOURCES additional.cpp)

# 获取列表长度
list(LENGTH SOURCES len)

# 输出列表长度
message(STATUS "Number of source files: ${len}")

# 获取并打印列表中的所有元素
foreach(SRC IN LISTS SOURCES)
message(STATUS "Source file: ${SRC}")
endforeach()

option

在CMake中,option()命令用于定义和管理用户在配置项目时可以设置的选项。这些选项通常用于控制构建过程中是否启用某些功能或代码块。

语法

1
option(<option_variable> "description of the option" [initial value])

示例

1
2
3
4
5
6
7
#The option command
option(OPTIMIZE "Do we want to optimize the operation?" ON)
message("Are we optimizing? ${OPTIMIZE}")

if(OPTIMIZE)
message("We are optimizing.")
endif()

if

在CMake中,if语句是控制逻辑的基本构件,它允许根据条件执行不同的代码路径。它的基本形式很像其他编程语言中的if语句,可以执行基于条件的编译指令、设置变量、调整项目设置等操作。

语法

1
2
3
4
5
6
7
if(<condition>)
# 命令...
elseif(<condition>) # 可选的
# 更多命令...
else() # 可选的
# 其他命令...
endif()

示例

1
2
3
4
5
6
7
8
9
10
11
12
13
14
15
16
17
18
19
20
21
22
23
24
25
26
27
28
29
30
31
32
33
34
35
36
37
38
39
40
41
42
43
44
45
46
47
48
49
50
51
52
53
54
55
56
57
58
59
60
61
62
63
64
65
66
67
68
69
70
71
72
73
74
75
76
77
78
79
80
81
#The if command
#https://cmake.org/cmake/help/latest/command/if.html

#[==[

Conditions with the if command
. Generally, you pass the non dereferenced variable as a condition to the if command
. Here is my understanding of the command:
. If the variable is undefined: evaluate to false
. If the variable is defined and set to false: evaluate to false
. Otherwise evaluate to true
#]==]

# set(VAR1 TRUE)
# if(VAR1)
# message("VAR1 is true")
# else()
# message("VAR1 is false")
# endif()

#--------------------------------------------------------------

#Directly passing TRUE or FALSE in an if command
#The only way I can get this to print "VAR2 is true" is to set VAR2 to 1
#We keep this in mind and move on for now. Avoid in practice
# set(VAR2 TRUE)
# if(${VAR2})
# message("VAR2 is true")
# else()
# message("VAR2 is false")
# endif()


#--------------------------------------------------------------
#Variable expansion cmake docs:
#https://cmake.org/cmake/help/latest/command/if.html#variable-expansion

# set(var1 OFF)
# set(var2 "var1")
# if(${var2})
# message("var2 is true")
# else()
# message("var2 is false")
# endif()

# if(var2)
# message("var2 is true")
# else()
# message("var2 is false")
# endif()


#--------------------------------------------------------------
#Other checks we can do
#https://cmake.org/cmake/help/latest/command/if.html#comparisons

# #EQUAL
if(2 EQUAL 1)
message("2 EQUAL 1")
else()
message("2 NOT EQUAL 1")
endif()


# #LESS
set(DOG "Cow")
set(PIG "Dog")

# if(PIG LESS DOG)
# message("PIG LESS THAN DOG")
# else()
# message("PIG NOT LESS THAN DOG")
# endif()


# #STRLESS_EQUAL
if(PIG STRLESS_EQUAL DOG)
message("PIG LESS THAN OR EQUAL TO DOG")
else()
message("PIG NOT LESS THAN OR EQUAL TO DOG")
endif()

循环

foreach

语法

1
2
3
foreach(loop_var IN LISTS list_name)
# 执行对每个元素的操作...
endforeach()

while

语法

1
2
3
while(condition)
# 循环内的命令...
endwhile()

示例

1
2
3
4
5
6
7
8
9
10
11
12
13
14
15
16
17
18
19
20
21
22
23
24
25
26
27
28
29
30
#Foreach Loop
# # Define a list of names
set(names "Alice" "Bob" "Charlie" "David" "Eve")

# Iterate through the list of names using a foreach loop
# foreach(name ${names})
# message("Name: ${name}")
# endforeach()


# While Loop
# Define a list of names
set(names "Alice" "Bob" "Charlie" "David" "Eve")

# Get the number of names in the list
list(LENGTH names num_names)

# Initialize a counter variable
set(counter 0)

# Create a while loop to iterate through the list of names
while(counter LESS num_names)
list(GET names ${counter} name)

# Print the name
message("Name: ${name}")

# Increment the counter
math(EXPR counter "${counter} + 1")
endwhile()

function

在CMake中,function命令用于定义一个新的函数。函数在CMake中是一种将一组命令封装在一起以便重用的方式。它类似于其他编程语言中的函数或过程,可以接受参数,执行操作,并在结束时返回。

语法

1
2
3
function(<name> [arg1 [arg2 [arg3 ...]]])
# 函数体,CMake命令...
endfunction()

示例

1
2
3
4
5
6
7
8
9
10
11
12
13
14
15
16
17
18
19
20
21
22
23
24
25
26
27
28
29
30
31
32
33
34
35
36
37
38
39
40
41
42
43
44
45
46
47
48
49
50
51
# A function that mimicks the return mechanism in languages like C++
# function(ModifyGlobalVariables VAR1 VAR2)
# set(${VAR1} "New Value for VAR1" PARENT_SCOPE )
# set(${VAR2} "New Value for VAR2" PARENT_SCOPE )
# endfunction()

# # Define two global variables
# set(GLOBAL_VAR1 "Original Value for VAR1")
# set(GLOBAL_VAR2 "Original Value for VAR2")

# message("Before function call:")
# message("GLOBAL_VAR1: ${GLOBAL_VAR1}")
# message("GLOBAL_VAR2: ${GLOBAL_VAR2}")

# # Call the function to modify the global variables
# ModifyGlobalVariables(GLOBAL_VAR1 GLOBAL_VAR2)

# message("After function call:")
# message("GLOBAL_VAR1: ${GLOBAL_VAR1}")
# message("GLOBAL_VAR2: ${GLOBAL_VAR2}")


#------------------------------------------------------------
#A function that increments a variable

function(IncrementVariable VAR)
math(EXPR ${VAR} "${${VAR}} + 1")
set(${VAR} ${${VAR}} PARENT_SCOPE)
endfunction()

# Define a variable
set(MyVariable 0)

# Call the function to increment the variable
IncrementVariable(MyVariable)
#Print the value in the variable
message("MyVariable: ${MyVariable}")

# # Call the function to increment the variable
IncrementVariable(MyVariable)
#Print the value in the variable
message("MyVariable: ${MyVariable}")


# # A loop that calls the IncrementVariable function twice
foreach(loop_var RANGE 1)
message("loop_var: ${loop_var}")
IncrementVariable(MyVariable)
endforeach()

message("MyVariable: ${MyVariable}")

macro

CMake宏是CMake构建系统的一个功能,允许用户定义一组命令,然后在CMake脚本中多次调用这组命令。

语法

1
2
3
macro(<name> [arg1 [arg2 [arg3 ...]]])
# ... CMake commands ...
endmacro(<name>)

示例

1
2
3
4
5
6
7
8
9
10
11
12
13
14
15
16
17
18
19
20
21
22
23
24
25
26
27
28
29
30
31
32
33
34
35
36
37
38
39
40
41
42
43
44
45
46
47
48
49
50
51
# Macro that mimicks the return mechanism in languages like C++
# macro(ModifyGlobalVariables VAR1 VAR2)
# set(${VAR1} "New Value for VAR1" )
# set(${VAR2} "New Value for VAR2" )
# endmacro()

# # Define two global variables
# set(GLOBAL_VAR1 "Original Value for VAR1")
# set(GLOBAL_VAR2 "Original Value for VAR2")

# message("Before mcro call:")
# message("GLOBAL_VAR1: ${GLOBAL_VAR1}")
# message("GLOBAL_VAR2: ${GLOBAL_VAR2}")

# # Call the function to modify the global variables
# ModifyGlobalVariables(GLOBAL_VAR1 GLOBAL_VAR2)

# message("After macro call:")
# message("GLOBAL_VAR1: ${GLOBAL_VAR1}")
# message("GLOBAL_VAR2: ${GLOBAL_VAR2}")


#------------------------------------------------------------
#Set up a macro that increments a variable

macro(IncrementVariable VAR)
math(EXPR ${VAR} "${${VAR}} + 1")
# set(${VAR} ${${VAR}} PARENT_SCOPE)
endmacro()

# Define a variable
set(MyVariable 0)

# Call the macro to increment the variable
IncrementVariable(MyVariable)
#Print the value in the variable
message("MyVariable: ${MyVariable}")

# Call the macro to increment the variable
IncrementVariable(MyVariable)
#Print the value in the variable
message("MyVariable: ${MyVariable}")


# #Write a loop that calls the IncrementVariable function twice
foreach(loop_var RANGE 1)
message("loop_var: ${loop_var}")
IncrementVariable(MyVariable)
endforeach()

message("MyVariable: ${MyVariable}")

示例CMake项目四

文件目录

1
2
3
4
5
6
7
8
9
10
11
12
13
14
15
16
17
18
19
20
21
E:\CMAKE\CMAKESERIES\EP018
│ CMakeLists.txt

└─src
│ information.cpp
│ information.h
│ main.cpp

├─math
│ │ CMakeLists.txt
│ │ supermath.cpp
│ │
│ └─include
│ supermath.h

└─stats
│ CMakeLists.txt
│ stats.cpp

└─include
stats.h

代码

CMakeLists.txt

1
2
3
4
5
6
7
8
9
10
11
12
13
14
15
16
17
18
19
20
21
22
23
24
25
26
27
28
29
30
31
32
33
34
35
36
37
38
39
40
41
42
43
44
45
46
47
48
49
50
51
52
53
54
55
56
57
58
59
60
61
62
63
64
65
66
67
68
#[=[

Show cmake variables in the context of a project
. Root level
. Included CMakeLists.txt files
. Show that
. add_subdriectory adds a new variable scope
. include still works in the global scope. Contrast this with the project in Ep009 where we used include

Show cache variables

Show environment variables (Windows)

Show how to use functions
. The create_and_link_executable function will wrap around the commands
. add_executable
. target_link_libraries

Show gui tools
. cmake-gui (Windows)
. ccmake (Linux-Mac)
. Higlight the three stages of cmake
. Configuration
. Generation
. Build

#]=]

cmake_minimum_required(VERSION 3.20)

project(Rooster)

# The include command sets up a new variable scope. The OUR_PROJECT_VERSION variable is being set in the
# three CMakeLists.txt files. We will see output saying that the project version is "One" because the variables
# set in included files live in their own scope.
set(OUR_PROJECT_VERSION "One")

#Set up a cache variable named THE_SKY_IS_BLUE
set(THE_SKY_IS_BLUE "Yes" CACHE STRING "Is the sky blue?")

# The math library
add_subdirectory(src/math)

# The stats library
add_subdirectory(src/stats)

#Set the source files to use
set(SOURCE_FILES
src/main.cpp
src/information.cpp
src/information.h
)

function(create_and_link_executable EXEC_NAME LIB_NAME SOURCES)
add_executable(${EXEC_NAME} ${${SOURCES}})
target_link_libraries(${EXEC_NAME} PUBLIC ${LIB_NAME} )
endfunction()

#The executable target
# add_executable(rooster ${SOURCE_FILES})
# target_link_libraries(rooster PUBLIC libstats)

create_and_link_executable(rooster libstats SOURCE_FILES)

message("Our project version is ${OUR_PROJECT_VERSION}")
message("Custom message: The compiler we're using is ${CMAKE_CXX_COMPILER}")
message("The processor architecture is $ENV{PROCESSOR_ARCHITECTURE}")
message(${THE_SKY_IS_BLUE})

src/information.h

1
2
3
4
5
#include <iostream>

namespace Logging{
std::string getOsName();
};

src/information.cpp

1
2
3
4
5
6
7
8
9
10
11
12
13
14
15
16
17
18
19
20
21
22
#include "information.h"

namespace Logging{
std::string getOsName()
{
#ifdef _WIN32
return "Windows 32-bit";
#elif _WIN64
return "Windows 64-bit";
#elif __APPLE__ || __MACH__
return "Mac OSX";
#elif __linux__
return "Linux";
#elif __FreeBSD__
return "FreeBSD";
#elif __unix || __unix__
return "Unix";
#else
return "Other";
#endif
}
};

src/main.cpp

1
2
3
4
5
6
7
8
9
10
11
12
13
14
15
16
#include <iostream>
#include <vector>
#include "stats.h"
#include "supermath.h"
#include "information.h"

int main(int argc, char** argv){

std::vector<int> v = {7, 5, 16, 9};

int avg = mean(v.data(),v.size());
std::cout << "mean : " << avg << std::endl;
std::cout << "We are on " << Logging::getOsName() << std::endl;

return 0;
}

src/math/CMakeLists.txt

1
2
3
4
# The math library
set(OUR_PROJECT_VERSION "Two")
add_library(libmath STATIC supermath.cpp)
target_include_directories(libmath PUBLIC ${CMAKE_CURRENT_SOURCE_DIR}/include)

supermath.h

1
int add(int a, int b);

supermath.cpp

1
2
3
4
5
#include "supermath.h" //Declaration

int add(int a, int b) {
return a + b;
}

src/stats/CMakeLists.txt

1
2
3
4
5
# The stats library
set(OUR_PROJECT_VERSION "Three")
add_library(libstats STATIC stats.cpp)
target_include_directories(libstats PUBLIC ${CMAKE_CURRENT_SOURCE_DIR}/include)
target_link_libraries(libstats PUBLIC libmath)

stats.h

1
double mean(int* values, int count);

stats.cpp

1
2
3
4
5
6
7
8
9
#include "supermath.h"

double mean(int* values, int count) {
int sum = 0;
for (int i = 0; i < count; i++) {
sum = add(sum, values[i]);
}
return (double)sum / count;
}

FetchContent

FetchContent 是 CMake 3.11 及以上版本中的一个模块,它使得在构建期间下载外部依赖成为可能。FetchContent 可以在配置时间从给定的URL下载文件或者克隆git仓库,然后在构建期间使用这些下载的内容。使用 FetchContent 的好处是它允许项目自动处理外部依赖,无需手动下载或者将外部库的源代码包含在项目中。

示例

1
2
3
4
5
6
7
8
include(FetchContent)
FetchContent_Declare(
fmt
GIT_REPOSITORY https://github.com/fmtlib/fmt.git
GIT_TAG 10.1.1
)

FetchContent_MakeAvailable(fmt)

代码测试

Google Test官方文档

Catch2官方文档

代码文档

Doxygen

Doxygen Awesome

## 代码管理

CPM

vcpkg

Conan

项目初始

CMake-init

该封面图片由RobPixabay上发布